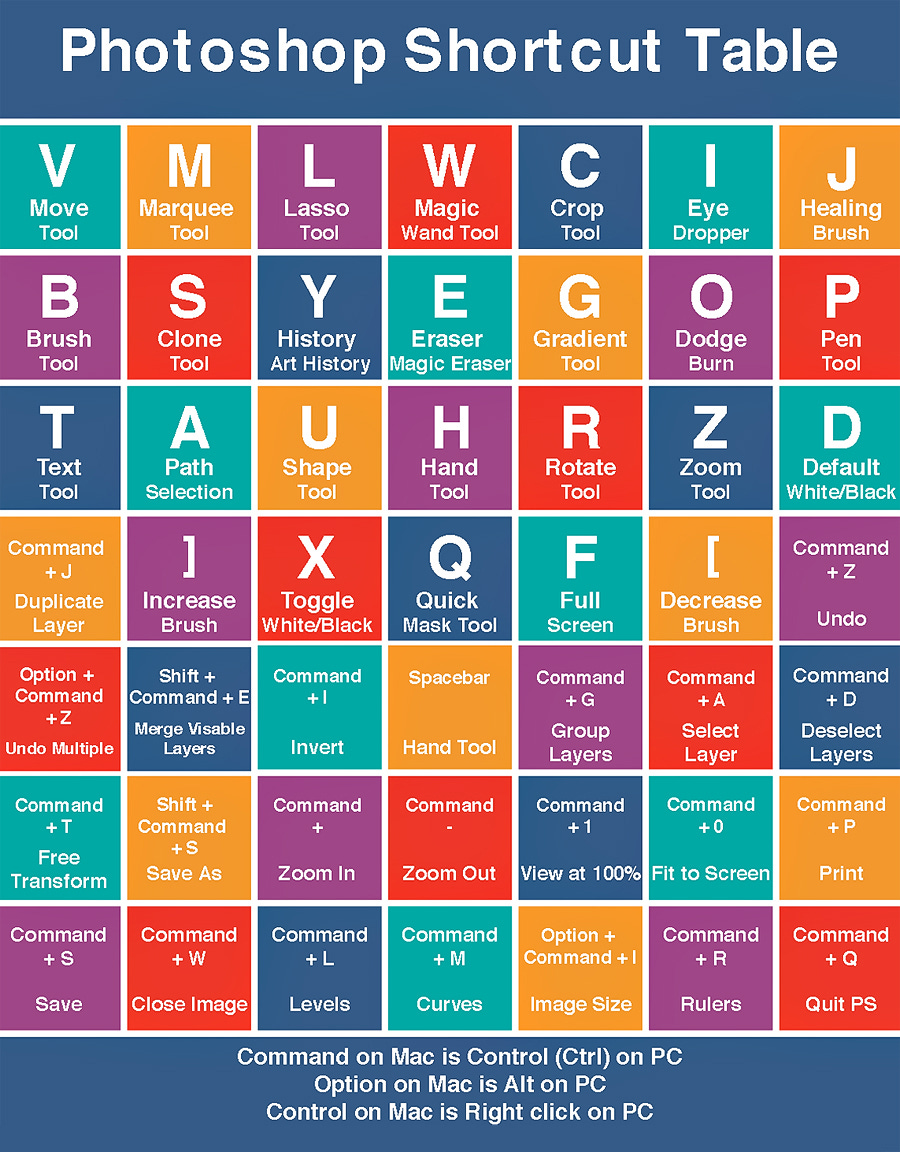
Photoshop User's Newsletter
Unlock Your Creativity: Tips, Tutorials, and the Latest in Adobe Photoshop


Fine-tune Colors of your landscape photos with the Color Balance Adjustment Layer in Photoshop! Feel free to follow along this Photoshop Tutorial by downloading the raw file in the link below the video.
Overview of Photoshop Color Grading Tutorial
Purpose: Demonstrates the use of Photoshop's color balance adjustment layer for enhancing landscape images.
Focus: Adding warmth to highlights and midtones, and cooling shadows for balanced color grading.
Step-by-Step Process
Initial Setup
Open the raw image in the Camera Raw editor.
Adjust profile from Adobe Color to Adobe Landscape for better saturation and brightness.
Basic Adjustments
Exposure Correction: Reduce highlights to reveal sky details and adjust blacks to fix underexposure.
Brightness and Contrast: Increase whites, tweak shadows, and reduce overall contrast for visual appeal.
White Balance and Saturation: Increase warmth and adjust the tint to fix green color casts (from ND filter).
Enhancements: Increase vibrance, saturation, texture, clarity, and dehaze for sharper, more defined images.
Masking Techniques
Sky Masking: Add warmth selectively with temperature and tint adjustments.
Water Masking: Lighten water areas and increase clarity without affecting the foreground elements.
Shadow Enhancement: Adjust contrast, clarity, and color temperature to cool shadow areas.
Sky Top Darkening: Apply a linear gradient to make the top of the sky darker and cooler.
Light Effects and Gradients
Add radial gradients for subtle light effects and adjust whites and blacks for natural highlights.
Color Grading Techniques
Hue and Saturation Adjustments: Shift yellows to reds and oranges, decrease distracting green hues, and fine-tune overall saturation.
Split Toning in Raw Editor:
Highlights: Warm hues.
Midtones and Shadows: Cooler hues for balanced contrast.
Calibration Tool: Adjust blue primary saturation and other color calibrations for better warmth and visual appeal.
Photoshop Fine-Tuning
Color Balance Adjustment Layer:
Target highlights, midtones, and shadows with slight tweaks towards red, magenta, and yellow for warmth.
Contrast between warm highlights and cool shadows enhances depth.
Additional Adjustments:
Spot Healing: Clean up unwanted elements in the image.
Hue/Saturation Layer: Reduce blue saturation for a warmer look.
Final Review and Tips
Show before-and-after comparisons to highlight improvements.
Emphasize subtle, incremental changes for natural-looking enhancements.